Game Analysis #16: Owen Defense
This is the craziest game I've seen among my early (2012) online games. So I'm going to skip a few moves into a position that would look like any normal game. But in fact, both sides have sustained losses in material. I lost a pawn right off the bat and my opponent sacrificed a piece for another of my pawns. So I was up a piece for two pawns.
Position 1
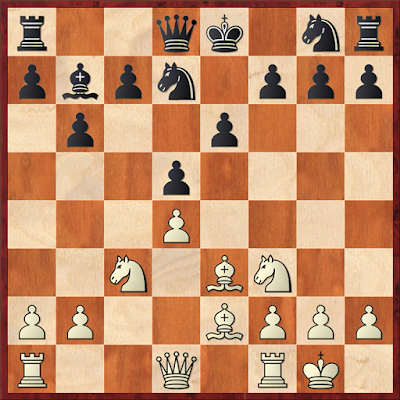
As I mentioned, this first position seems like any normal position but if you count the material, I'm up a piece for two pawns. I'll show the annotation of the whole game later in this post to show you how it got to this point. So far, it seems like anything can happen. Although White is almost fully developed, Black has no glaring weaknesses.
Play can continue with Black developing his knight, castling, and finishing his development. Also, he has options of attacking my center and occupying enough space in the center with his pawns. White should take advantage of the early lead in development to put pressure on Black. It would be best if White can keep the Black king in the middle but that would be improbable without taking big risks. Let's move on to the next position where things will get a bit more interesting.
Position 2

After 13 moves, we have this position. As you can see, White's pieces are more disjointed and all over the place. While Black seems to have it all together. Material count is still the same, White is ahead with a minor piece for two pawns. But in terms of position, White has no good prospects for attack until he coordinates his pieces. You can also see that after Black's move Nc6, White has several hanging pieces such as the knight on h4 and the b-pawn. The dark-squared bishop is also attacked.
It's White's turn to move and the knight takes priority over the pawn so I saved the knight. It gets more complicated after this.
Position 3

From the second position, this is where we arrive at after 19 moves. Black is now up a pawn and has a very menacing attack on both sides. He has a pawn majority on the queen side and a battery on the king side. Black's move was d4 and White has some chances of surviving this onslaught. If White moves Ne4, it might alleviate some of his problems but not all. Black clearly has the advantage but he has to still be careful not to allow White to launch a counterattack. If Black can maneuver his knight to e3, he will have a very big advantage. That brings us to the final position only a few moves later.
Final position

As you can see, in this final position White resigns due to the insurmountable threats against the king. You will also notice that White lost his knight and is clearly losing.
There were numerous ways that could have prevented this outcome. In the full game analysis, I will give a few of those alternate moves that I could have done to make the position tenable for White. Though Black made a ridiculous sacrificial blunder at the start of the game, he had waited for the right opportunities to take back his piece and gain the advantage later on in the end. Most of White's lead dissipated mainly due to his own mistakes.
Analysis


Comments
Post a Comment