10 Beginner Mistakes to Avoid
Hanging Pieces
A common mistake is to leave your pieces
undefended, vulnerable to being captured by your opponent’s pieces. Oftentimes,
when you place a piece on a square, it may not immediately be under attack but
it’s not always completely safe because your opponent can maneuver his pieces
and unleash tactics against you. Here's a sample position:
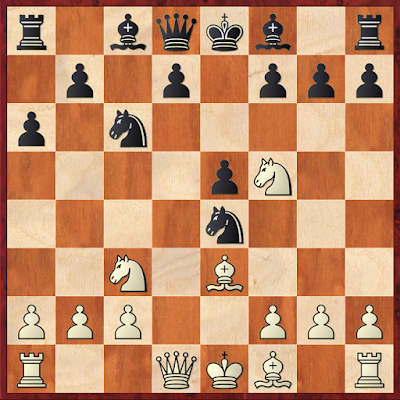
In the above example, Black had just taken the e-pawn with his knight, thinking perhaps that after Nxe4 and d5, he would get his piece back but little does he know that White already has an advantage after this position because White can defend both of his knights with the move Neg3 and after g6, Nh6 would save the knight or better yet, according to the engine, Bg5 instead of Neg3 would gain a tempo on the queen and White could save his knights afterward.
Technically, this was a voluntary hanging of one's piece or a sacrifice although usually, sacrifices have compensation and this move is just a blunder, plain and simple. Black hung his knight because he thought he could regain it through tactics but the tactics backfired and he's now left with an ugly position and down a piece. Usually, when someone hangs a piece it's because they didn't see that it was undefended but whether it was through neglect (passive) or miscalculation (active), hanging pieces can cost you a big chunk of your chances of winning.
It’s always good to defend your pieces
with your pawns and maintain a solid pawn structure so that you can reduce your
weaknesses and the chances for your opponent to attack you. Also, be wary of
your opponent undermining your structure. Though you may have a solid base of
pawns, when your opponent begins pushing his pawns toward your camp and
attacking your pawns, you must be prepared to defend your camp or launch a
counterattack when he does.
Mate Threats
One of the coolest traps I learned was
the Fishing Pole trap because the combination is so enticing to beginners if you
haven’t encountered it yet. Basically, the side setting up the trap would bait
his opponent by sacrificing one of his pieces to get at his castled king. One
variation where this is plausible to do is the Sicilian Taimanov variation in
which case Black sets up the trap by putting his queen on c7 and plonking his
knight on g4 to attack the h2 square. When White tries to expel the knight with
h3, Black would calmly offer his knight and play h5 but this knight is just a
bait and must not be taken because it would open White up for mate threats.
Most mate threats are visible to the
trained eye however, there are subtle mate threats. And they are usually a part
of a combination and could be three or four moves away thus calculation would
be useful during complex positions where tactics abound. But one thing I’ve
always noticed is that when your king is in a cramped position where your
pieces can’t immediately transfer to defend then it is vulnerable to attack by
prying or poking it open with pawns or piece sacrifices.
Let's see an example:

Let's see an example:

The ever infamous Scholar's Mate attack by White was a trap I fell into when I started playing chess in school for our sports fest event (intramurals) and it's most likely popular in lower levels or those who are unaware of this line. The unsuspecting victim may be taken aback by the sudden attack White has launched against his king - a mate threat early on in the game. After Qh5 by White, Black would usually commit one error after another such as g6? trying to defend mate, but Qxe5! forks the king and the rook. This is a mate threat in the opening but there are loads of mate threats that can be done during the middle game and end game so always be wary of your king!
Missing Tactics
Neglecting tactics is just as bad for you
if you miss an opportunity to launch one or miss a threat by your opponent but
it is common even at the highest level. Some of the basic tactics that I first
learned was forks where one piece attacks two of your opponent’s pieces. Then
you have pins which renders your opponent’s piece unable to move because either
it’s illegal or it’s going to lose you a piece. There are many other tactics
besides these but I will enumerate them in another article.
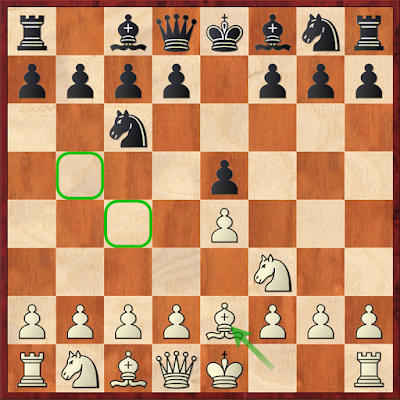
So far, when we make inaccurate moves, they give rise to tactics against us. But what if the position is not at all clear whether White or Black has the advantage. In equal positions, it would be difficult to spot tactics but that doesn't mean they're not there.

Just to demonstrate the concept, here's an interesting position where White is attacking the g7 pawn with his knight and bishop, Black plays the move d6 thereby allowing White to fork his queen and rook. Note: I just noticed that White's knight was actually hanging before I made Black's move but just imagine that White made the move d3 before playing his knight to g5. In any case, missing tactics and hanging pieces like in this case would put you at a big disadvantage although not completely lost unless it's a series of tactics that you missed and you lost most of your pieces (which happened to me a number of times online).
Overextending Pawns
Pushing your pawns and gaining space is
not a bad thing but you have to be careful that you don’t leave holes in your
position because as a common saying goes, “Pawns don’t move backwards.”
Therefore, the squares that these pawns vacate could be nice outposts for your
opponent if you don’t protect them with your own pieces. This allows your
opponent to establish a foothold in your camp and harass your pieces or even
your king.

The above position is one from the Alekhine Defense which is a legitimate defense of Black against 1. e4 although it does have its own drawbacks and advantages for both sides. For White, one of the biggest drawbacks is overextending his pawns which basically means that his pawns are leaving holes or spaces which Black's pieces can try to control later on such as the squares highlighted above.

The above position is one from the Alekhine Defense which is a legitimate defense of Black against 1. e4 although it does have its own drawbacks and advantages for both sides. For White, one of the biggest drawbacks is overextending his pawns which basically means that his pawns are leaving holes or spaces which Black's pieces can try to control later on such as the squares highlighted above.
Misplaced Pieces
Some important principles I learned were
that you must control the center with your pieces and pawns so that is usually
where pieces and pawns belong for you to have a solid position. There are
exceptions to the case however but that will be topic of another article. In
any case, it’s usually best to have your bishops on the long diagonal pointing
at your opponent’s castled king. Knights on the rim are dim so they should be
placed on squares like b5, c5, f5, and g5. Queens should be centralized so that
they can control the most number of squares and support other pieces. Rooks
need to be behind pawns or better yet at the seventh (for White) or second (for
Black) ranks. The name of the game is control and if your pieces are not primed
(placed optimally) for control, it will be hard to win the game.

Again, just to demonstrate the concept, we have White moving his knight aimlessly to the side where it doesn't do anything useful. Misplaced pieces are what the name implies, they are misplaced because they are put on squares where they don't contribute to the game. It's always best to ask oneself what the purpose of one move is. It doesn't always mean that if a knight is on the rim that it's no longer serving any purpose because it depends on the context of the given situation.

Again, just to demonstrate the concept, we have White moving his knight aimlessly to the side where it doesn't do anything useful. Misplaced pieces are what the name implies, they are misplaced because they are put on squares where they don't contribute to the game. It's always best to ask oneself what the purpose of one move is. It doesn't always mean that if a knight is on the rim that it's no longer serving any purpose because it depends on the context of the given situation.
Losing Tempo
Time is another very crucial element of
the game. That’s why the principle is to develop all your pieces and put your
king to safety at the beginning of the game because the pressure builds up the
longer you play the game and it would be harder to attain these objectives at
the latter part of the game. This also explains why the queen should not be
played out too early because she’s vulnerable to attack and when your opponent
is able to attack your queen and develop his pieces simultaneously, you have
already lost time to get your own pieces out because you would be busy getting
your queen to safety. In thinking about good moves to play in the opening,
tempo is key because you don’t want to waste any time making a move and usual
moves that waste time are moves that allow your opponent to attack you or
launch a tactic against you. But if you are able to make these kinds of moves
yourself, then it would be to your benefit.

We see the Alekhine Defense here again to demonstrate another concept which is losing tempo because in the first four moves of the game, we see Black's knight being kicked around by White's pawns from one side of the board to the other and that is Black's disadvantage, that he loses tempo and gets a slightly cramped position because he has less space in the center. We've discussed White's drawbacks and of course, his advantage is the big center but Black can actually chip away at it considering that the pawns are overextended. Black also is very solid in these setups.

We see the Alekhine Defense here again to demonstrate another concept which is losing tempo because in the first four moves of the game, we see Black's knight being kicked around by White's pawns from one side of the board to the other and that is Black's disadvantage, that he loses tempo and gets a slightly cramped position because he has less space in the center. We've discussed White's drawbacks and of course, his advantage is the big center but Black can actually chip away at it considering that the pawns are overextended. Black also is very solid in these setups.
Undeveloped Pieces
Again, you want to be able to control as
much of the board as possible and you won’t be able to do that if your pieces
are lounging around at the back rank. They have to move away from their initial
position and they must be placed in key squares where they would be the most
productive. There have been games where the other side was bulldozed because
one of his pieces got stuck at the back and couldn’t get into the game and help
out. As much as possible get all your pieces out and working. But there are
certain openings where it’s not so easy but let’s not get into that right now.

As you can see from the above position, Black has made pawn moves for the first seven moves while White has been bringing his pieces out into the game. Usually, being behind in development is a big disadvantage but in the above position, Black is actually fine despite lagging in developing his pieces. This is probably one of the few exceptions to the principle but for the sake of demonstrating the concept, I just went with this position simply because it is obvious that White has a lead in development but if, say, this was a Spanish opening or a Queen's Gambit opening and all of Black's pieces are still at their starting positions, then Black needs to worry a lot.

As you can see from the above position, Black has made pawn moves for the first seven moves while White has been bringing his pieces out into the game. Usually, being behind in development is a big disadvantage but in the above position, Black is actually fine despite lagging in developing his pieces. This is probably one of the few exceptions to the principle but for the sake of demonstrating the concept, I just went with this position simply because it is obvious that White has a lead in development but if, say, this was a Spanish opening or a Queen's Gambit opening and all of Black's pieces are still at their starting positions, then Black needs to worry a lot.
Passive Squares
It is one thing to not develop your
pieces but it doesn’t help if you develop them on bad squares and by bad, I
mean passive squares where they’re not really contributing to your position.
Piece activity is another crucial element in order to gain control so sometimes
it would be good to place your bishop on the side of the board because it
controls a square that would be important for your opponent’s pieces or say a
knight on the rim is not always dim because it controls some squares that could
help increase pressure or gain control. It might sound confusing but you always
have to ask what the purpose of your move is and sometimes, it doesn’t matter
if you move it backwards or bring it on the side as long as it is doing
something pertinent to the position at hand.
This is probably simple enough. Here, the normal move for White's light-squared bishop is either b5 (Spanish opening) or c4 (Italian opening) but he chose to play Be2 which I think may be an actual line although it's way too passive for the bishop and one should probably refrain from getting into this position unless it's part of preparation. Again, piece activity is determined either by how many squares a piece controls or how it defends one's position or how it restrains the opponent's pieces. Basically, the more roles a piece does in a position, the more active it is.

This is probably simple enough. Here, the normal move for White's light-squared bishop is either b5 (Spanish opening) or c4 (Italian opening) but he chose to play Be2 which I think may be an actual line although it's way too passive for the bishop and one should probably refrain from getting into this position unless it's part of preparation. Again, piece activity is determined either by how many squares a piece controls or how it defends one's position or how it restrains the opponent's pieces. Basically, the more roles a piece does in a position, the more active it is.
Unsafe King
Should I leave my king in the center? Or
should I castle? Most of the time, I would rather castle but I have seen
certain positions where players leave their king in the center but usually
that’s because the center is relatively closed and there are no immediate
threats against the king. However, it’s usually best to castle the king because
that’s one of the best ways to keep your king safe.


This is another throw away position but for demonstration's sake, let's use it. Basically, from what one can infer, White's king is stuck in the center and he can't castle anymore. This is aggravated by the fact that the center is half open and Black's pieces can easily pile up and put pressure in the center to break it open. And Black would be wishing he had castled instead.
Cramped Position
Space
is super important when you’re trying to gain as much control in this game. You
need good squares to put your pieces on but if your opponent got there first
then it would be difficult to get good squares for yours. Usually, a cramped
position is not so bad if you are able to hang on and defend while trying to
chip away at your opponent’s structure or maneuver your pieces to better
squares. But it’s usually good to exchange pieces when you’re in a cramped
position to free up some space and allow your other pieces to move. Also, this
would reduce the threat of your king being mated.
Lastly, I would say that Black has a cramped position somewhat on the kingside because his pieces do not have enough space to move about although he can actually trade off some pieces so that he can breathe in the position although be careful because Black's king is in a very precarious position, if White can take control of the long diagonal pointing to Black's king, he will be a goner.
***
So that's about it for this post. I hope you got something out of it!


Comments
Post a Comment