Game Analysis #14: Ruy Lopez, Cozio Defense
The Ruy Lopez or the Spanish opening is one of the oldest and most studied openings out there. It's one of the most often played openings as well in the e4 repertoire along with the Sicilian defense. White often has a slight advantage but variations have arisen to give Black equality.
One of the reasons why I don't want to play the Ruy Lopez is that it's very theoretical. You can't play it by intuition alone otherwise, your opponent might steamroll you if you don't know the twists and turns. In analyzing this game, I checked to see what variation of the Ruy Lopez was played. It appears that the name of this variation is the Cozio Defense. According to my research, out of 2800 games in the 365chess database, White wins 45.5% and Black wins 28%.
When I played this game, I wasn't really sure what to do. The problem I usually have in heavily theoretical openings is actually the middle game. Trying to develop a plan and strategy when the situation on the board is unclear is a difficult task. It's a daunting task and I admit it's my weakness. I can easily get flustered or impatient and just make the most instinctive move.
So let's get into the game. In analyzing this, I broke it down into certain positions.
The first position looks like a typical Ruy Lopez except with a pair of knights exchanged. White has a very slight advantage, mainly because of the initiative. White's light-squared bishop is on a good square, controlling the center, eyeing the f7-square, and pinning the knight. Although Black is also quite solid here. Black is two moves to castling and three moves to complete development. Everything seems fine for both sides.
The next move I made was c3, hoping to take Black's b-pawn since the knight can't recapture because of the pin. Also this prepares an eventual d4 push and it makes way for the queen to go to b3 or c2. That was my thought although in hindsight, I think castles O-O or d3 would have been fine too. I seriously need to complete my development as well and c3 does not give my dark-squared bishop any room to move. Just a thought that we should take hold of here.


One of the reasons why I don't want to play the Ruy Lopez is that it's very theoretical. You can't play it by intuition alone otherwise, your opponent might steamroll you if you don't know the twists and turns. In analyzing this game, I checked to see what variation of the Ruy Lopez was played. It appears that the name of this variation is the Cozio Defense. According to my research, out of 2800 games in the 365chess database, White wins 45.5% and Black wins 28%.
When I played this game, I wasn't really sure what to do. The problem I usually have in heavily theoretical openings is actually the middle game. Trying to develop a plan and strategy when the situation on the board is unclear is a difficult task. It's a daunting task and I admit it's my weakness. I can easily get flustered or impatient and just make the most instinctive move.
So let's get into the game. In analyzing this, I broke it down into certain positions.
Position 1

The first position looks like a typical Ruy Lopez except with a pair of knights exchanged. White has a very slight advantage, mainly because of the initiative. White's light-squared bishop is on a good square, controlling the center, eyeing the f7-square, and pinning the knight. Although Black is also quite solid here. Black is two moves to castling and three moves to complete development. Everything seems fine for both sides.
The next move I made was c3, hoping to take Black's b-pawn since the knight can't recapture because of the pin. Also this prepares an eventual d4 push and it makes way for the queen to go to b3 or c2. That was my thought although in hindsight, I think castles O-O or d3 would have been fine too. I seriously need to complete my development as well and c3 does not give my dark-squared bishop any room to move. Just a thought that we should take hold of here.
Position 2

This next position should look familiar because it was featured on Tactics Puzzles #5. In this position, it's White's turn to move and I made the wrong move. I played Nxd4, but White should have simply played Bxc6 because it wins a piece. White did not need to worry about the queen getting trapped because there was ample room to escape. But Nxd4 is not a bad move, it's not the best move but it's playable for White.
So the next few moves went Nxd4 Ne5, Qb3 Bxd5, Qxd5. Now, instead of Qxd5, exd5 would have been fine since bxc3 then Qxc3. White would still maintain a little advantage. Instead the game went after Qxd5 bxc3, bxc3 c6.
Position 3

My assessment of this position is that White is still okay but Black has some good advantages. He has a rook on the open b-file. His knight is nicely centralized. And he is almost done with development. White several weaknesses namely isolated pawns and lack of development. But looking on the bright side, White can still move his pieces around to coordinate them and place them on better squares. For example, a few good moves would be Nf5, Bf4 or even Ba3, and Rb1. Before that, White needs to move the queen. However, I decided to exchange knights for a pawn.
Now, I can see why that was a mistake. Sure, you get a pawn but that wouldn't last long. I didn't take into account that after that exchange, Black's pieces would spring into action. Since I'm lagging in development, I wouldn't have enough time to take advantage of the extra pawn. While Black can simply keep attacking and ramp up the pressure.
A lot of things happened after that. The queens got exchanged a few moves after the knights and Black began activating his rooks. Let's look at the next position.
A lot of things happened after that. The queens got exchanged a few moves after the knights and Black began activating his rooks. Let's look at the next position.
Position 4

It's White's turn to move and it seems like there's no way of increasing pressure. Black is tied to the defense of his pawns but I didn't see a way moving forward so I went with a prophylactic move Kh2. Now I can see there are other moves I could have done like Rd4 or Rb5. During the latter phases of the game, one thing I can glean from this game is that activity is almost equal to dominance. The side that has more active pieces gets to control the flow of the game. Of course, pawn structure is also very important because that determines whether you have any weaknesses that can be exploited. The more unstable the pawn structure, the more weaknesses to target, and that results in less control.
If you have a superior pawn structure along with more active pieces, it will be a lot easier for you to spot good moves, notice tactics, and dictate the game. You have less liabilities to think about and you don't have to keep defending. But I made a mistake in this position and that was Kh2. Remember, activity is key. After that, Black took control of the game. We reached the next position which is a good point to resign.
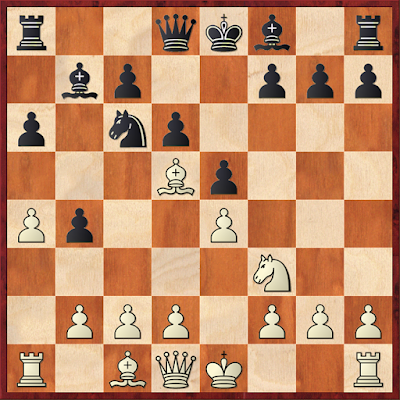
Position 5

At this point, White doesn't have much chances. It would be great if the White king were on c2 instead of e4 and the White bishop were on c3. Then perhaps we can say that White might have a fighting chance. But as it stands, White is tied. Perhaps the only way of moving forward that might give White a slight chance is h5. I'll show you the possible ways this can go from here in the analysis board below.
Position 6 (final)

This is the final position and it's just winning for Black. So I resigned.


Comments
Post a Comment